Introduction
Is your IPTV streaming setup delivering the quality and stability your viewers expect? If you’re experiencing buffering issues, noticeable latency, or inconsistent video quality, the problem might not be your internet connection—it could be your encoding solution. An IPTV Encoder is the backbone of professional live video broadcasting, transforming raw video signals into optimized streams that reach audiences worldwide with minimal delay and maximum clarity.
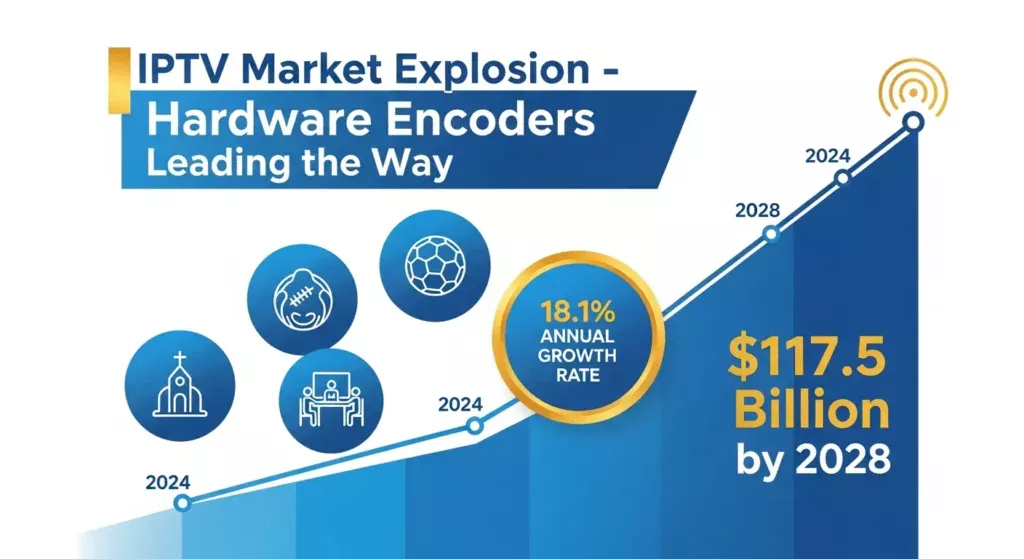
The global IPTV market is projected to reach $117.5 billion by 2028, growing at a compound annual growth rate of 18.1%. This explosive growth is driven by the rising demand for live streaming across industries—from sports broadcasting and corporate events to church services and educational webinars. As more content creators and businesses transition from software-based encoding to dedicated IPTV hardware, the difference in performance becomes undeniable.
Hardware encoders eliminate the computational bottlenecks that plague software solutions. They deliver rock-solid stability, superior video compression, and low-latency streaming that keeps viewers engaged. Whether you’re an IPTV reseller managing multiple channels, a live streamer building your brand, or a business deploying professional broadcasting infrastructure, understanding what an IPTV Encoder can do for your workflow is the first step toward streaming excellence.
In this comprehensive guide, we’ll explore the seven proven benefits of using an IPTV Encoder, walk through a step-by-step setup process, examine real-world deployment scenarios, and share expert tips to help you avoid common pitfalls. By the end, you’ll have a clear roadmap for upgrading your streaming performance.
What Is an IPTV Encoder and Why It Matters
An IPTV Encoder is a specialized hardware device that converts raw video signals from cameras, media players, or video switchers into compressed digital streams optimized for internet delivery. Think of it as a translator that takes high-bandwidth video input and transforms it into efficient, streamable formats viewers can watch without overwhelming their internet connections.
The encoding process involves video compression using industry-standard codecs like H.264 or H.265 (HEVC). These codecs reduce file sizes by eliminating redundant visual information while preserving image quality. A typical uncompressed 1080p video stream requires around 3 Gbps of bandwidth—completely impractical for internet delivery. An H.264 encoder compresses this to just 5-10 Mbps, making live streaming accessible to mainstream audiences.
Encoder vs Transcoder: Understanding the Difference
While the terms are sometimes used interchangeably, there’s an important distinction. An encoder converts raw, uncompressed video into a compressed format. An IPTV transcoder takes an already-encoded stream and converts it to a different format, resolution, or bitrate. For example, a transcoder might take a 1080p H.264 stream and create additional 720p and 480p versions for adaptive bitrate streaming.
Why Hardware Encoders Matter for Professional Workflows
Professional broadcasting demands reliability that software encoders cannot guarantee. Software encoders running on general-purpose computers compete for CPU resources with other applications, creating unpredictable performance, dropped frames, and stream interruptions. Hardware encoders are purpose-built for encoding video with dedicated processing chips, optimized firmware, and thermal designs ensuring consistent 24/7 performance. An IPTV Encoder can run continuously for months without reboots, making it ideal for hotel IPTV systems, security camera streaming, and continuous channel broadcasting.
Core Components of an IPTV Encoder
Understanding core components helps you make informed purchasing decisions and optimize your streaming setup.
Video Input Interfaces
Modern encoders support multiple input types. HDMI to IP conversion is most common, accepting signals from cameras, computers, and media players. HDMI supports resolutions up to 4K and carries both video and audio in a single cable. Professional encoders also offer SDI (Serial Digital Interface) inputs, the broadcast industry standard providing superior signal integrity over long cable runs (up to 300 feet).
Codec Types and Compression Standards
H.264 encoder technology remains the most widely supported standard, offering excellent quality-to-compression ratios that work across virtually all devices. H.265 / HEVC provides roughly 50% better compression than H.264, meaning you can stream 1080p content at 3-4 Mbps instead of 6-8 Mbps. However, H.265 requires more processing power for encoding and decoding, and older devices don’t support it.
Streaming Output Formats and Protocols
Professional encoders support multiple streaming protocols:
RTMP streaming (Real-Time Messaging Protocol) is standard for YouTube Live, Facebook Live, and Twitch, providing reliable delivery over standard internet connections.
UDP (User Datagram Protocol) offers the lowest latency—typically under 100ms—ideal for video production monitoring and interactive streaming.
HLS (HTTP Live Streaming) breaks video into small chunks delivered over standard HTTP, highly compatible with CDNs and web browsers but adds 10-30 seconds latency.
SRT (Secure Reliable Transport) combines low latency with error correction, perfect for streaming over unreliable networks like cellular connections.
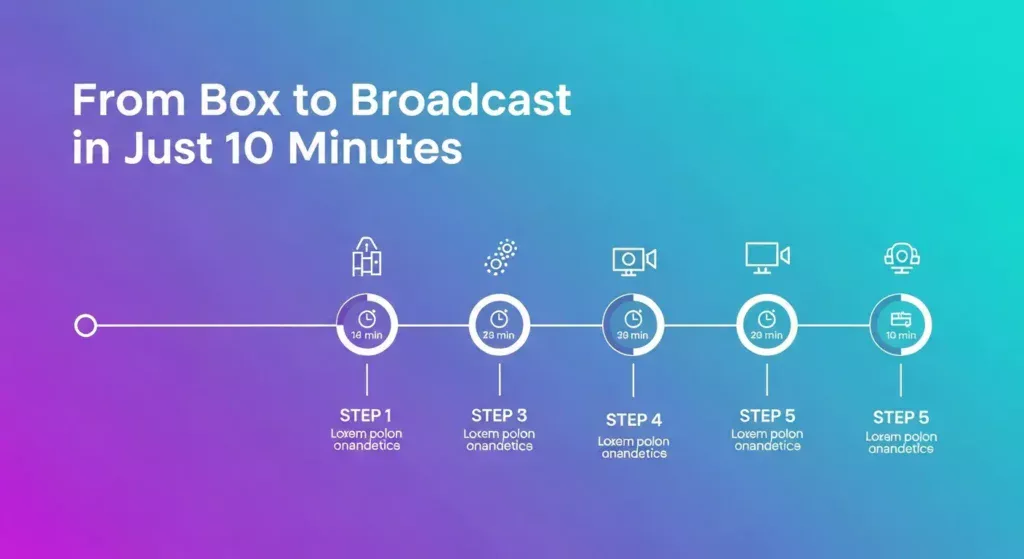
Setup Time & Efficiency
From unboxing to broadcasting, a quality IPTV Encoder can be operational in approximately 10 minutes. The typical setup process:
- Physical connections: 2-3 minutes – Connect video source, ethernet, and power
- Network configuration: 3-5 minutes – Assign IP address, gateway, and DNS
- Stream destination setup: 2-3 minutes – Enter RTMP URL and stream key
- Quality optimization: 1-2 minutes – Set resolution, bitrate, and codec
- Testing: 1-2 minutes – Verify stream quality
Static IP addressing is strongly recommended for encoder setup. Static IPs ensure your encoder always has the same network address, preventing connection issues after network reboots. Software encoders like OBS Studio require 30-60 minutes of configuration, plus a dedicated computer running continuously.
Step-by-Step IPTV Encoder Setup Guide
Step 1: Connect Your Video Source
Connect your video source to the encoder’s input using high-quality HDMI or SDI cables. Poor quality cables cause signal dropouts, color artifacts, or connection failures.
Pro Tip: Budget $10-20 for quality HDMI cables and $30-50 for professional SDI cables. Certified cables prevent intermittent issues in professional streaming.
Step 2: Configure Network Settings
Access your encoder’s web interface and switch from DHCP to static IP. Choose an IP address within your network’s range but outside the DHCP pool. Set subnet mask, gateway (your router’s IP), and DNS servers (like 8.8.8.8).
Pro Tip: Document network settings in a configuration spreadsheet including device name, MAC address, IP address, location, and stream destination for each unit.
Step 3: Set Streaming Destination
Configure where your stream is sent:
YouTube Live: Copy stream URL and key from YouTube Studio → Create → Go Live Facebook Live: Get stream URL and key from Publishing Tools → Video Library → Live Custom RTMP servers: Enter rtmp://server-address/application and your stream key VLC testing: Enable UDP output (udp://@:1234)
Step 4: Optimize Bitrate & Resolution
Balance resolution, bitrate, and bandwidth:
- 1080p @ 60fps: 8,000-10,000 Kbps (sports, gaming)
- 1080p @ 30fps: 5,000-6,000 Kbps (presentations, interviews)
- 720p @ 60fps: 4,500-6,000 Kbps (limited bandwidth)
- 720p @ 30fps: 3,000-4,000 Kbps (bandwidth constraints)
Your stream bitrate should not exceed 80% of available upload speed.
Pro Tip: For mobile-first audiences, 720p provides excellent quality at lower bandwidth. For desktop viewing or large screens, 1080p justifies the extra bandwidth.
Step 5: Go Live
Press the encode button and monitor your dashboard showing bitrate, frame rate, network statistics, input signal status, encoder temperature, and uptime. Verify the stream reaches your audience with 5-15 seconds latency for RTMP platforms.
Pro Tip: Configure backup stream destinations for critical broadcasts. Many encoders support secondary RTMP outputs that automatically engage if the primary fails.
Performance & Streaming Quality Benchmarks
Maximum Resolution and Frame Rate
- Entry-level encoders (under $500): 1080p @ 30fps, H.264 only
- Mid-range encoders ($500-$2,000): 1080p @ 60fps, H.264/H.265 support
- Professional encoders ($2,000+): 4K @ 60fps, multi-channel capability
Supported Bitrate Ranges
| Encoder Tier | Maximum Bitrate | Optimal Use Case |
|---|---|---|
| Entry-level | 10 Mbps | Single stream, standard quality |
| Mid-range | 20 Mbps | High-quality single stream |
| Professional | 40+ Mbps | Multi-stream, 4K applications |
End-to-End Latency Comparison
Low-latency streaming is critical for interactive applications:
- UDP streaming: 50-100ms – Production monitoring
- SRT streaming: 200-500ms – Balanced latency with reliability
- RTMP streaming: 3-10 seconds – Social media platforms
- HLS streaming: 10-30 seconds – High compatibility
Hardware encoders minimize encoding delay to just 1-2 frames, whereas software encoders add 5-10 frames.
Protocol Support Matrix
| Protocol | Best For | Typical Latency | Firewall Friendly |
|---|---|---|---|
| RTMP | Social media platforms | 3-10 sec | Yes |
| UDP | Local monitoring | 50-100ms | No |
| HLS | Web delivery, mobile | 10-30 sec | Yes |
| SRT | Remote production | 200-500ms | Yes |
Better Alternatives & Add-Ons
H.265 Encoders for Bandwidth Savings
H.265 / HEVC encoders deliver 50% better compression. You can maintain 1080p quality at 3-4 Mbps instead of 6-8 Mbps with H.264. This bandwidth efficiency is valuable for IPTV resellers managing multiple channels, mobile streaming using cellular modems, and venues with hundreds of simultaneous viewers. Test viewer device compatibility before deployment.
Use-Case-Based Recommendations
Churches: Mid-range H.264 encoder ($400-800) with RTMP output to YouTube and Facebook
Esports: Low-latency SRT encoders with 1080p60 capability ($1,000-2,000)
Corporate events: Professional dual-stream encoders ($1,500-3,000)
IPTV resellers: Multi-channel encoders ($3,000-8,000) handling 4-8 video sources
Deployment Use Cases
IPTV Resellers Running 24/7 Channels
Maria runs an IPTV reseller business providing 50+ channels to residential subscribers. She uses a rack-mounted 8-channel encoder converting satellite feeds into IPTV streams at 4-6 Mbps per channel. The hardware encoders have run flawlessly for 18 months with only scheduled firmware updates. Previously, server-based software encoding experienced frequent crashes requiring manual intervention.
Live Sports Streaming
A semi-professional soccer league deployed a portable IPTV Encoder with HDMI input connected to a broadcast camera and 4G LTE modem. Using SRT protocol, they stream 1080p30 at 5 Mbps. The SRT protocol’s error correction handles variable cellular network quality, maintaining consistent video quality even when signal strength fluctuates.
Church Broadcasting
A 500-member church installed a permanently-mounted IPTV Encoder connected to a three-camera video switcher, streaming to YouTube Live at 1080p. The encoder’s built-in audio processing ensures consistent sound levels between music and spoken word. Simple operation allows volunteer operators with minimal technical knowledge to manage broadcasts confidently.

Common IPTV Encoder Mistakes to Avoid
Choosing the Wrong Streaming Protocol
Mistake: Using UDP for internet streaming or RTMP for time-critical local monitoring.
Fix: Match protocols to use cases—RTMP for YouTube/Facebook, UDP for local monitoring, SRT for remote locations, HLS for maximum compatibility.
Ignoring Firmware Updates
Mistake: Never updating encoder firmware, missing bug fixes and security patches.
Fix: Check for firmware updates quarterly. Test updates on non-critical equipment first and backup configurations before updating.
Overloading Bitrate
Mistake: Setting encoder bitrate higher than available upload bandwidth.
Fix: Test upload speed before configuring encoders. Set stream bitrate to maximum 80% of available bandwidth to account for network overhead.
Poor Network Configuration
Mistake: Using DHCP on production encoders, resulting in changing IP addresses.
Fix: Always use static IP addressing. Configure proper gateway, subnet mask, and DNS settings.
Not Testing Before Critical Events
Mistake: Assuming everything will work perfectly without prior testing.
Fix: Always run test streams before critical broadcasts. Verify connectivity, stream quality, audio levels, and monitoring systems.
Maintenance & Long-Term Storage Tips
Monthly Airflow Cleaning
Dust accumulation blocks ventilation and causes overheating. Monthly cleaning prevents this. Power down the encoder, use compressed air to blow out dust from ventilation openings, and wipe exterior surfaces with a soft cloth.
Firmware Update Schedules
Establish quarterly firmware reviews. Check manufacturer websites for updates, read release notes, and determine if updates are necessary. Always backup encoder configuration before updating firmware.
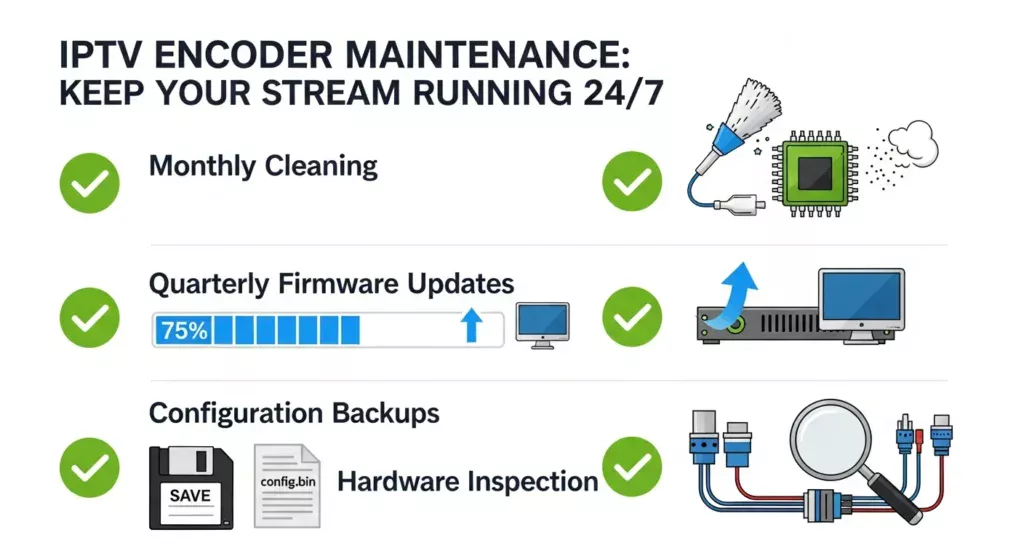
Backing Up Encoder Configurations
After optimizing your encoder settings through trial and error, back up the configuration to avoid recreating it from scratch after factory resets or hardware replacement. Most encoders offer configuration export through their web interface. Save these files with descriptive names like “Encoder-Main-Sanctuary-2025-01-29.cfg” and store them in multiple locations—your computer, cloud storage, and network file server.
For deployments with multiple encoders, maintain a configuration management system documenting each unit’s settings, network information, and intended purpose. This documentation is invaluable when troubleshooting issues or training new team members.
Preventive Hardware Inspection
nspect encoder connectors and cables every three months. Look for:
- Loose or corroded connections
- Damaged cable jackets or exposed conductors
- Bent connector pins on HDMI or SDI ports
- Discolored power connectors indicating overheating
Replace any questionable cables or connectors before they cause stream failures during critical broadcasts. Professional broadcast cables cost more initially but last significantly longer than consumer-grade alternatives.
Conclusion
An IPTV Encoder transforms amateur streaming into professional broadcasting. The seven proven benefits—rock-solid reliability, superior video quality, low-latency performance, multi-protocol flexibility, easy setup, 24/7 operational capability, and scalable architecture—deliver measurable improvements over software encoding solutions.
Whether you’re an IPTV reseller managing multiple channels, a content creator building your audience, or an organization broadcasting to stakeholders, investing in dedicated encoding hardware pays dividends in stability, quality, and peace of mind. The combination of H.264 or H.265 compression, professional streaming protocols, and purpose-built hardware creates a broadcasting foundation that scales with your ambitions.
Ready to upgrade your IPTV broadcast? Try an IPTV Encoder today and experience smoother, more reliable streaming. Share your setup in the comments or subscribe for more IPTV gear reviews and tutorials!
Frequently Asked Questions
Q1: What is the difference between an IPTV encoder and a transcoder?
An encoder converts raw video into a streamable format, while a transcoder modifies existing streams by changing resolution or bitrate. Think of an encoder as the first step in the streaming workflow—it takes HDMI or SDI input and creates compressed streams. A transcoder works with already-encoded video, creating multiple versions for adaptive bitrate streaming or converting between codecs.
Q2: Can I use one IPTV encoder for multiple platforms at once?
Yes, many IPTV encoders support multi-streaming to YouTube, Facebook Live, and custom RTMP servers simultaneously. Mid-range and professional encoders typically offer 2-4 simultaneous RTMP destinations, allowing you to reach multiple audiences from one video source without additional hardware. Some advanced models also support different protocols concurrently—for example, RTMP to social media, UDP for local monitoring, and SRT to a remote production facility.
Q3: Do IPTV encoders support 4K?
Some high-end models support 4K @ 60fps, though 1080p H.264 remains the most bandwidth-efficient standard. 4K encoding requires significantly more processing power and bandwidth—typically 15-25 Mbps for acceptable quality. Unless your audience primarily views on large screens and has reliable high-speed internet, 1080p provides the best balance of quality, compatibility, and bandwidth efficiency. Most professional broadcasters use 1080p for live streaming and reserve 4K for recorded content.
Q4: How much upload bandwidth do I need for IPTV streaming?
Your upload bandwidth should be at least 25% higher than your target stream bitrate. For 1080p streaming at 6 Mbps, you need minimum 8 Mbps upload. This headroom accounts for network overhead, bandwidth fluctuations, and maintains stream stability during temporary internet congestion. Test your actual upload speed during the time of day you’ll stream, as bandwidth varies significantly during peak usage hours.
Q5: Can IPTV encoders work with wireless internet connections?
Yes, but wired ethernet connections are strongly recommended for stability. Wireless introduces latency variability, potential interference, and connection drops that can interrupt streams. If you must use wireless, choose encoders with dual-band WiFi support, position them close to your access point with clear line-of-sight, and use 5GHz bands for less interference. For critical broadcasts, always use wired connections or implement 4G/5G bonding solutions specifically designed for video streaming.
Q6: What’s the expected lifespan of a hardware encoder?
With proper maintenance and cooling, quality hardware encoders typically last 5-7 years of continuous operation. Professional broadcast-grade units can exceed 10 years. The main wear items are cooling fans, which can be replaced easily. Solid-state components rarely fail if operated within temperature specifications. Budget encoders using consumer-grade components may last 2-3 years under heavy use. The key to longevity is maintaining proper ventilation, keeping firmware updated, and protecting against power surges with quality surge protectors or UPS systems.